
Before starting hydraulic brake bleeding, ensure you gather all necessary tools, including a clear hose, catch container, and fresh brake fluid. Wear safety goggles and gloves, park on a level surface, and check the brake fluid level and system for leaks. Follow proper procedures, monitor the fluid and bubbles continuously, and keep the reservoir topped off. To make certain your brake system is safe and effective, it’s vital to follow this safety checklist thoroughly—more detailed steps await you.
Key Takeaways
- Gather all necessary tools, safety gear, and fresh brake fluid before starting the bleeding process.
- Ensure the vehicle is on a level surface and the brake fluid reservoir is properly topped off.
- Inspect the brake system for leaks or damage prior to bleeding to ensure safety.
- Attach a hose to the bleeder valve submerged in a container of brake fluid for effective air removal.
- Keep brake fluid levels constant, monitor for air bubbles, and test brake pedal firmness before driving.

Hydraulic brake bleeding is a essential maintenance process that guarantees your brake system functions safely and effectively. When you notice your brake pedal feels spongy or unresponsive, it’s a clear sign that air has entered the brake lines, and bleeding procedures are necessary. The main goal is to remove any trapped air and replace old or contaminated brake fluid with fresh fluid to restore maximum braking performance. Before you get started, it’s imperative to understand the importance of using the correct brake fluid type specified for your vehicle, as mixing different types or using incorrect fluid can lead to system damage.
Hydraulic brake bleeding removes air and old fluid for safe, effective braking performance.
To begin, gather all the necessary tools and supplies, including a clear hose, a catch container, a wrench, and fresh brake fluid. Always wear safety goggles and gloves to protect yourself from brake fluid, which is corrosive and can cause skin irritation. Before bleeding, ensure your vehicle is parked on a level surface, and the wheels are chocked to prevent movement. Check the brake fluid reservoir and top it off with fresh brake fluid if it’s below the recommended level, but do not overfill. This step is essential because a low fluid level can introduce more air into the system during bleeding.
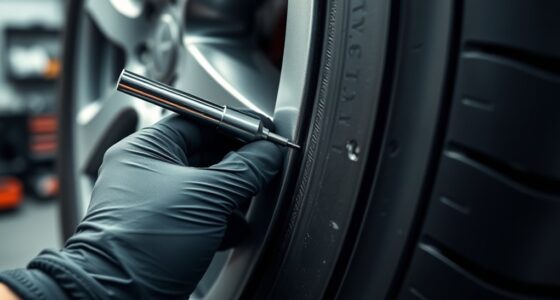
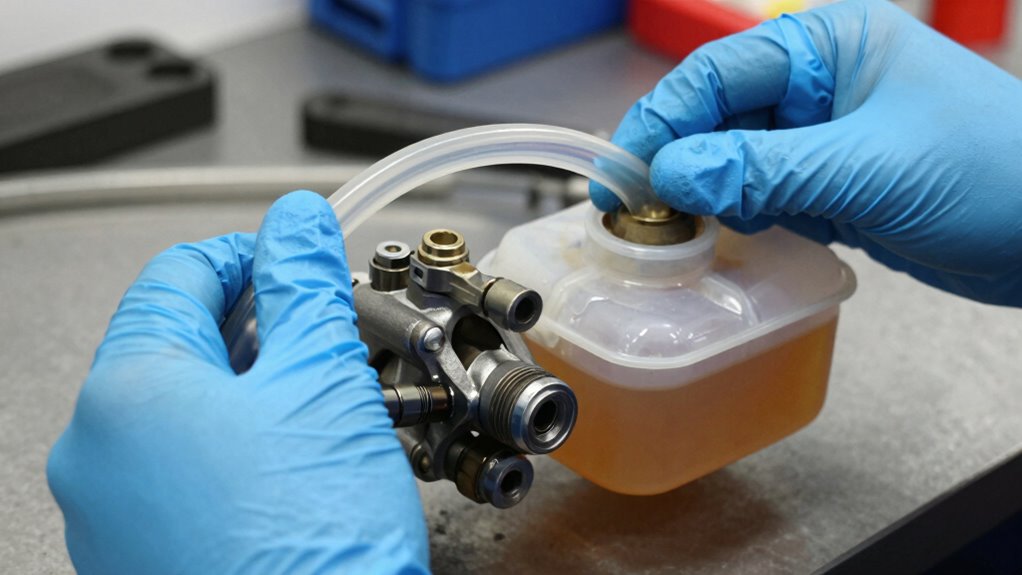
Next, you’ll want to familiarize yourself with the specific bleeding procedures for your brake system. Most procedures involve attaching a hose to the brake caliper or wheel cylinder’s bleeder valve, with the other end submerged in a container filled with brake fluid. Have an assistant press the brake pedal slowly and firmly, then hold it down while you open the bleeder valve to release air and old fluid. Close the valve before releasing the pedal to prevent air from re-entering. Repeat this process, ensuring the brake fluid reservoir stays topped up throughout, to push out any trapped air. As you work through the bleeding procedures, keep an eye on the color and clarity of the brake fluid exiting the hose — it should be clear or slightly amber. Continue until you see no more air bubbles and the brake pedal feels firm and responsive. Properly bleeding the brakes also helps maintain the color accuracy of the brake fluid, which is important for system health.
Throughout the process, constantly monitor the brake fluid level in the reservoir. Never let it fall below the minimum mark, as air can be drawn into the system, undoing your efforts. Once you’re satisfied with the bleeding, test the brake pedal’s firmness by pressing it a few times before driving. Remember, proper brake fluid and meticulous bleeding procedures are key to guaranteeing your brakes operate safely and effectively, giving you confidence on the road.
Frequently Asked Questions
Can I Bleed Brakes Without Specialized Tools?
You can attempt to bleed brakes without specialized tools, but it’s not recommended. Using the right bleeding techniques, like the push-rod method, helps guarantee efficiency. Just remember, different brake fluid types, such as DOT 3 or DOT 4, require proper handling. Without proper tools, you risk air entering the system or uneven bleeding, which can compromise safety. For best results, use the appropriate tools and follow correct procedures.
How Often Should Brake Fluid Be Replaced?
Think of brake fluid maintenance like changing the oil—regular upkeep keeps things running smoothly. You should replace your brake fluid every 2 years or 24,000 miles, whichever comes first. Fresh brake fluid ensures your braking system stays responsive, which is essential for vehicle safety. Ignoring this can lead to brake failure or reduced performance. Stay proactive, and you’ll keep your brakes in top shape, ensuring safe driving every time.
Is It Necessary to Replace Brake Fluid During Bleeding?
Yes, you should replace brake fluid during bleeding to prevent brake fluid contamination and brake system corrosion. Fresh fluid guarantees that any moisture or debris is removed, maintaining peak brake performance. If the fluid has been in use for a long time, it’s especially important to replace it to avoid corrosion and contamination, which can compromise safety and cause brake failure. Regular replacement keeps your brake system functioning smoothly.
What Are Signs of Air in the Brake Lines?
You’ll notice spongy or soft brake pedal feel, longer stopping distances, or brake fluid contamination signs like discoloration or debris, indicating air in the brake lines. Air bubbles can prevent proper brake function, so it’s essential to bleed the system correctly. This process helps remove trapped air, ensuring effective braking and preventing brake fluid contamination, which can compromise safety. Always check for these signs before and during bleeding.
Can Brake Bleeding Be Done by a Beginner?
Think of brake bleeding as opening a secret door in your car’s safety system. As a beginner, you can do it, but you must follow proper safety precautions and focus on brake system maintenance. Use the right tools, work patiently, and stay alert for leaks or air bubbles. If unsure, seek guidance or professional help—your safety and vehicle’s performance depend on precise, careful work.
Conclusion
Now that you know the essential steps, remember, skipping even one can jeopardize your safety. Think you’ve got it all under control? Think again. The next time you hit the brakes, will your hydraulic system hold up when it really matters? Don’t leave safety to chance—double-check everything. Because when it’s crunch time, a flawless bleed could be the difference between a confident stop and a disaster waiting to happen. Are you ready to guarantee it’s always the former?