
TL;DR
Placing your rig in a closet or small space is often about reducing reflections and sound leakage, not true soundproofing. Proper placement and targeted acoustic treatment make a huge difference. Ventilation and careful mic placement are key for a quiet, clear setup.
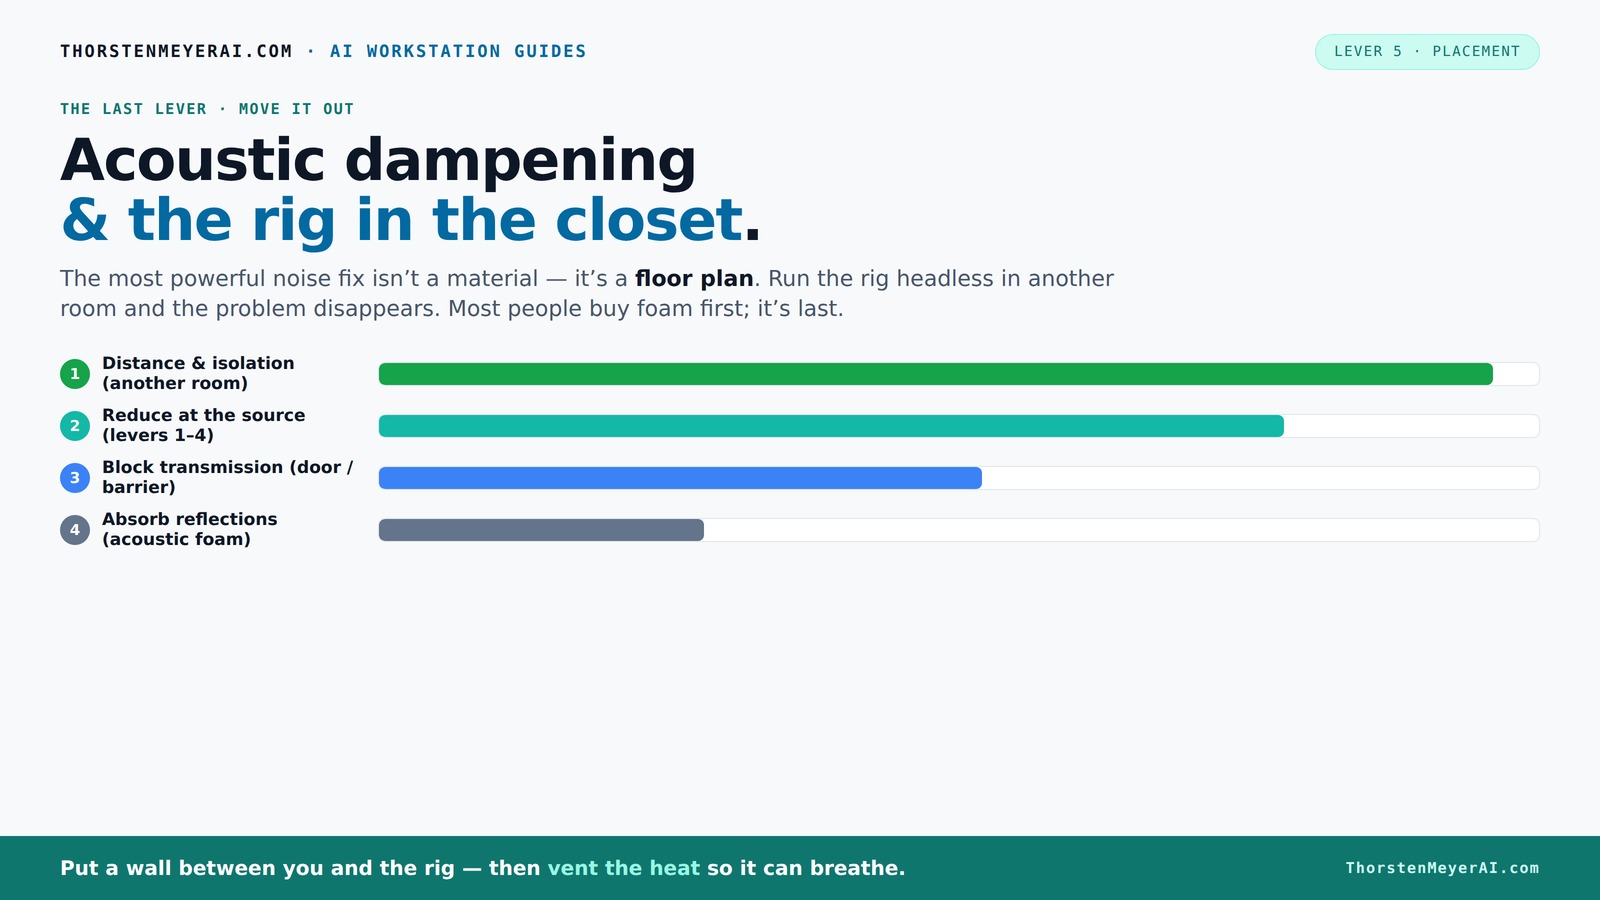
Acoustic dampening
& the rig in the closet.
The most powerful noise fix isn’t a material — it’s a floor plan. A rig you can’t hear because it’s in another room beats any amount of foam. Tap the approaches in Part 1 to see what actually works.
(another room)
(levers 1–4)
(door / barrier)
(acoustic foam)
Contain the noise, not the heat
Key Takeaways
- Placing your rig in another room or closet is the most effective noise reduction method.
- Ventilation is critical when isolating a machine in a sealed space; passive vents or quiet fans prevent overheating.
- Target acoustic absorption at reflection points — behind the mic, ceiling, and door — to tame echo.
- Sealing gaps around doors and windows cuts sound leaks significantly, often more than adding foam.
- Choosing the right microphone (dynamic vs. condenser) helps control room reflections and noise pickup.

24 Pack Black 12 x 12 x 2 Inches Pyramid Designed Acoustic Foam Panels, Sound Proof Foam Panels for Walls, High Density and Flame-Retardant Acoustic Panels, Sound Panels for Recording and Home Studio
Exceptional Sound Absorption:These pyramid acoustic panels are engineered to effectively absorb sound waves, reducing echo and reverberation. With...
As an affiliate, we earn on qualifying purchases.
As an affiliate, we earn on qualifying purchases.
Why Placement Matters More Than Anything Else in Your Closet Setup
Placing your rig or microphone correctly can drastically reduce noise and echo. Think of it like this: the farther the rig is from your ears, the quieter it sounds. Moving your machine into another room or closet cuts down the direct sound you hear by up to 90%. With a network connection, you can run your AI or gaming rig in the basement or closet while you sit comfortably at your desk.
For example, one creator moved their noisy GPU tower into a closet on the other side of the house. The difference? Night and day. They now work in silence, even during intense training runs. It’s not magic — just smart placement. No foam or absorption can beat distance for noise reduction.
Understanding the importance of placement is crucial because it directly influences how much sound leaks and reflections you have. When your gear is close to your microphone or ears, even tiny noises become prominent. Conversely, placing your equipment farther away or behind sound-absorbing barriers minimizes these issues. This simple step often yields the most immediate and noticeable improvements in sound quality and noise control, highlighting that strategic positioning is often more effective than expensive treatments alone.

Audimute Soundproofing Acoustic Door Seal Kit - Door Sweep and Seal - (Standard Size)
Includes a Door Seal (3/16" x 1/2" x 25') and a Door Sweep (1/2" x 1.5" x 4').
As an affiliate, we earn on qualifying purchases.
As an affiliate, we earn on qualifying purchases.
The 'Rig in the Closet' Strategy — How to Do It Right
Putting your rig in a closet can cut noise but brings heat management challenges. The key is ventilation. Without airflow, heat builds up fast, risking damage and throttling. Learn more about cooling and heat management for your setup. A simple trick? Add passive vents or a quiet exhaust fan, and make sure cool air can flow in. For high-power setups, consider a purpose-built soundproof cabinet with ducted airflow, which balances silence and cooling.
For instance, a streamer used a sealed closet with a small inline fan connected to a duct. They kept the room cool and the noise down. They also installed an exhaust vent with a temperature-controlled fan. This setup kept their rig cool, quiet, and efficient. Check out [this guide](https://thorstenmeyerai.com/reduce-heat-noise-ai-workstation/) for more cooling tips.
Effective ventilation isn't just about comfort; it's about preventing heat buildup that can cause hardware throttling or failure. For detailed cooling tips, visit this cooling guide. When your rig overheats, it often reduces performance, which can be confusing if you're also trying to keep noise levels low. The tradeoff here is finding a balance between adequate cooling and noise suppression. Properly designed ventilation systems, including ducted airflow and temperature-controlled fans, help maintain this balance, ensuring your rig stays cool and quiet without sacrificing performance.

Professional Studio Recording Microphone Isolation Shield, Pop Filter,High density absorbent foam is used to filter vocal. Suitable for Blue Yeti and other condenser microphones (AO-504 With Stand)
♪【The package contains】♪: Microphone Isolation Shield x 1, Metal Thread Adapter x 2 (Adapt most microphones), Adjustable Stand...
As an affiliate, we earn on qualifying purchases.
As an affiliate, we earn on qualifying purchases.
Acoustic Treatment in Tiny Spaces: What Works and What Doesn’t
In small closets, acoustic dampening isn’t about foam everywhere. It’s about smart placement of panels, blankets, and rugs. You can also explore proper acoustic placement techniques. Acoustic foam absorbs echoes, but it doesn’t block sound transmission. To really quiet a space, focus on the main reflection points: behind the mic, the ceiling, and the door.
For example, a creator placed thick blankets over the closet door and used foam panels on the wall behind the mic. The result? A dry, clear voice with minimal echo. Use a combination of soft materials on the ceiling, floor, and walls for the best results. Learn more about proper placement for small rooms.
Deepening your understanding of acoustic treatment reveals that the goal isn't just to deaden sound but to control how sound waves behave within the space. Strategic placement of absorptive materials at reflection points prevents echoes and reduces reverberation, creating a more controlled environment. Over-treating or placing materials randomly can create dead zones or unintended sound coloration. Therefore, understanding the room's specific acoustic profile helps in choosing the right materials and placement, resulting in a more natural and professional sound quality.

Focusound 52 Pack Acoustic Foam Panels 1" x 12" x 12" Sound Proof Foam Panles Soundproofing Noise Cancelling Wedge Panels for Home Office Recoding Studio with 300PCS Double-Side Adhesive
Soundproofing - Acoustic foam panels triangular grooves structure for better noise absorption, helps to reduce and absorb unwanted...
As an affiliate, we earn on qualifying purchases.
As an affiliate, we earn on qualifying purchases.
How to Block Sound Leaks Through Doors and Gaps
Gaps around the closet door are the weak link in noise control. Sealing these gaps with weatherstripping or acoustic sealant can cut sound leakage by over 50%. You can also hang a moving blanket or soft material over the door to absorb reflections and block sound transmission.
For example, a podcaster added weatherstripping around their closet door frame and hung a thick curtain. The noise from their mic stayed inside, and the room sounded much less 'boxy.' Small fixes like this are quick, cheap, and surprisingly effective.
Blocking sound leaks isn't just about sealing gaps; it's about understanding how sound escapes and replicates in your space. Small openings around doors, vents, or windows can act as sound funnels, allowing noise to travel outside or back into the room. Using dense materials like weatherstripping, sealant, or soundproof curtains creates physical barriers that prevent sound from leaking. These simple modifications can dramatically improve your acoustic isolation with minimal cost, and they often have a higher impact than adding extra foam or panels alone.
Floor and Ceiling: Easy Wins for Reducing Echo
Adding rugs or carpets on the floor can significantly reduce reflections bouncing off hard surfaces. Similarly, hanging acoustic panels or blankets from the ceiling cuts down on echo and ringing. In tiny spaces, every bit of absorption helps prevent that 'boxy' sound.
For instance, a voiceover artist laid down a plush rug and added foam panels to the ceiling. Their recordings went from muddy to crisp overnight. Simple, affordable, and highly effective.
Addressing floors and ceilings with absorption materials is often overlooked but can make a profound difference. Hard surfaces like tile or wood reflect sound waves, causing reverberation and echo. By introducing soft, porous materials like rugs, carpets, or ceiling-mounted panels, you break up these reflections. This not only makes the room sound more natural but also improves vocal clarity and reduces the need for post-processing. The tradeoff is minimal cost and effort for a significant leap in sound quality, especially in small, reflective spaces.
Choosing the Right Microphone for Your Closet or Small Space
In tight spaces, microphone choice makes a big difference. Condenser mics tend to pick up more room reflections, making the space sound worse. Dynamic mics are less sensitive to room acoustics, making them ideal for small booths.
For example, a creator switched from a condenser to a dynamic mic and immediately noticed less echo and background noise. Pairing the right mic with good placement and treatment creates a studio-quality sound in even the tiniest closet.
Understanding the characteristics of different microphones is essential because each type interacts differently with the environment. Condenser mics are highly sensitive, capturing subtle nuances but also picking up unwanted room reflections. Dynamic microphones, on the other hand, are more directional and less sensitive to ambient noise, making them more forgiving in small, untreated spaces. Selecting the right microphone involves considering your room's acoustic profile, your recording goals, and how much treatment you're willing to implement. This awareness allows you to optimize your setup for clarity and isolation without excessive modifications.
DIY Budget Tricks for a Better Closet Booth
You don’t need expensive gear to tame your closet. Use household items: blankets, pillows, rugs, and even moving pads. Tape or thumbtacks hold materials in place. Focus on the reflection points and gaps first.
For example, one creator used thick blankets over the door and foam panels made from leftover packing material. The result was a professional-sounding vocal booth on a shoestring budget. Remember, the goal is absorption and sealing, not fancy materials.
Effective DIY treatment relies on understanding where reflections and sound leaks occur. Using household items like blankets and pillows is not just cost-effective but also practical because these materials are porous and absorb sound naturally. The key is strategic placement—cover reflection points like the door, ceiling, and walls—and sealing any gaps to prevent sound escape. While cheap, these solutions can be surprisingly effective if applied thoughtfully, enabling you to build a functional recording space without breaking the bank.
Common Mistakes That Sabotage Your Closet Setup
Many DIYers make the mistake of over-treating or placing materials in the wrong spots. Blocking airflow, sealing the room too tightly, or ignoring door leaks can make things worse. Also, relying solely on foam panels without addressing reflections from the ceiling or door doesn't solve echo problems.
For example, a streamer sealed their closet tight with foam and no ventilation. Overheating caused the rig to throttle, and noise increased. Balance is key: treat the room, but keep it ventilated and open enough to prevent heat buildup.
Understanding common pitfalls allows you to avoid costly mistakes. Over-sealing or blocking airflow can lead to overheating, which not only damages equipment but can also cause noise issues if fans ramp up. Additionally, neglecting reflection points or sealing gaps improperly might give a false sense of security while echo and sound leaks persist. The optimal approach balances acoustic treatment with proper ventilation and strategic placement, ensuring your setup is both quiet and safe for your hardware.