
To install a dropper post and make sure it feels butter-smooth, start by measuring your seat tube diameter and choosing the right post. Install the post securely, adjusting the saddle to your preferred height before tightening the clamp. Connect the cable or hydraulic line carefully, ensuring smooth routing and proper seating. Then, adjust the remote lever and test the movement, lubricating and fine-tuning as needed. Keep your post clean and maintained, and you’ll enjoy seamless saddle adjustments every ride. You’ll discover more tips to optimize performance if you keep going.
Key Takeaways
- Measure and select the correct dropper post diameter and travel range for your bike and riding style.
- Ensure proper internal or external cable routing, using adapters if needed, for smooth operation.
- Lubricate the post’s moving parts and cables to eliminate resistance and prevent sluggishness.
- Test and adjust the remote lever for easy access and reliable saddle movement during rides.
- Regularly inspect and maintain the post, cables, and remote to keep the system buttery-smooth and responsive.
Installing a dropper post can considerably improve your riding experience by allowing quick saddle height adjustments on the fly. Whether you’re tackling technical descents or climbing steep trails, being able to instantly change your saddle position helps keep your center of gravity low and improves control. Before you get started, it’s essential to familiarize yourself with proper adjustment techniques and compatibility considerations. Not all dropper posts fit every bike, so double-check the diameter of your seat tube and the travel range suitable for your riding style.
Installing a dropper post enhances riding by enabling quick saddle adjustments for better control and comfort.
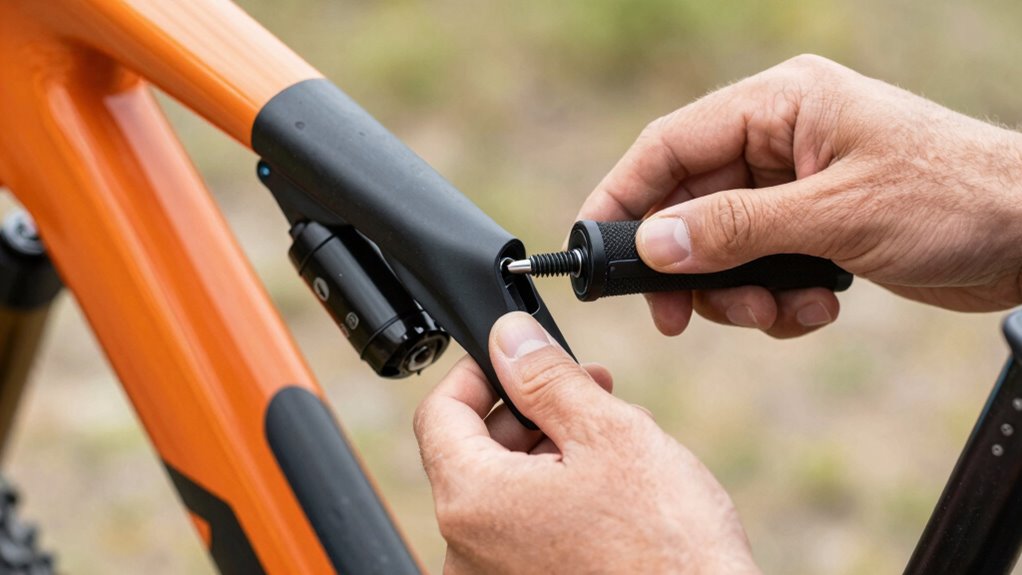
When it comes to adjustment techniques, precision is key. First, measure your current saddle height and determine your ideal riding position. Most dropper posts have a remote lever that activates the post’s movement, so ensure it’s comfortably accessible. Adjust the saddle height to your preferred riding position, then tighten the clamp securely, but avoid overtightening which could damage the post or seat clamp. Once installed, test the remote lever to confirm smooth operation—if the saddle doesn’t move easily or gets stuck, you might need to fine-tune the clamp or check for debris or misalignment.
Compatibility considerations are equally important. Dropper posts come in various diameters, typically 27.2mm, 30.9mm, or 31.6mm, so ensure that your seat tube matches the post’s diameter. Some bikes may require adapters or internal routing modifications, especially if you’re installing a remote cable system. Also, consider the travel length; a post with too much or too little travel might not suit your riding style or bike geometry. Check your frame’s specifications and your riding needs before purchasing. If your bike has internal cable routing, you’ll want to verify whether your frame allows for easy installation or if additional tools and skills are necessary. Proper installation and compatibility] are essential for ensuring smooth operation and safety.
Once installed, take time to test the saddle’s movement and responsiveness. Make sure the remote lever triggers the post smoothly and that the saddle stays secure in both raised and lowered positions. If you experience any resistance or sluggishness, lubricate the post or check for obstruction. Proper adjustment techniques and compatibility considerations guarantee your dropper post operates butter-smooth, giving you seamless control during rides. After everything’s set up correctly, you’ll enjoy quick, reliable saddle height changes that elevate your riding experience, making descents more confident and climbs more efficient.

Bibike Dropper Post 27.2/30.4/30.9/31.6mm x 440mm Length 125mm Travel Remote External Cable
- Diameter: 27.2mm outside diameter
- Length: 440mm length
- Travel: 125mm travel
As an affiliate, we earn on qualifying purchases.
As an affiliate, we earn on qualifying purchases.
Frequently Asked Questions
Can I Install a Dropper Post on Any Bike Frame?
You can’t install a dropper post on just any bike frame. Bike compatibility is key, so check your frame’s internal routing and diameter to guarantee it supports a dropper post. Some frames may require frame modifications, like drilling or adding ports, which can be tricky or void warranties. Always verify your bike’s specifications and consult your manufacturer or a professional bike shop before attempting installation.
What Tools Are Essential for Installing a Dropper Post?
Did you know that over 80% of bike riders upgrade their dropper posts for better control? To install one, you’ll need a tools checklist including a shock pump, Allen wrenches, and a cable cutter. Compatibility considerations are vital—measure your seat tube diameter and check if your frame has internal routing. Ensuring you have these tools and info guarantees a smooth, secure installation that feels buttery-smooth on every ride.
How Long Does the Installation Process Typically Take?
The installation time usually takes about 30 minutes to an hour, depending on your experience and bike setup. The difficulty level is moderate; if you’re comfortable with basic bike maintenance and have the right tools, it’ll go smoothly. Take your time to measure, align, and secure everything properly. Rushing can cause issues, so follow instructions carefully. Once done, you’ll enjoy a smoother, more responsive ride.
Is It Necessary to Lubricate the Dropper Post During Installation?
Think of installing your dropper post like oiling a bike chain—you want it smooth and responsive. Yes, dropper post lubrication is essential during installation; it prevents squeaking and ensures effortless operation. Follow these installation tips: apply a light layer of grease to the stanchion and post, avoiding over-lubrication. Proper lubrication keeps your dropper post feeling buttery-smooth, so take your time and follow these steps for maximum performance.
Will Installing a Dropper Post Affect My Bike’s Warranty?
Installing a dropper post generally won’t affect your bike’s warranty if you follow the manufacturer’s instructions. However, warranty implications depend on proper installation and frame compatibility, so make certain your frame can support the dropper post. If you install it correctly and use compatible components, you shouldn’t face warranty issues. Always check your bike’s warranty policy and consult a professional if you’re unsure about compatibility or installation procedures.
Conclusion
Once you install your dropper post, once you enjoy its smooth operation, once you appreciate its effortless height adjustment, you’ll wonder how you ever rode without it. A properly installed dropper post offers quick responsiveness, reliable performance, and ultimate control. When you prioritize quality installation, when you follow the steps carefully, when you test and adjust patiently, you’ll guarantee your ride remains seamless, your confidence stays high, and your cycling experience feels buttery-smooth every time you hit the trails.