To care for your bottom bracket, know that threaded models need simple cleaning and re-greasing, which you can do with basic tools like a wrench and crank puller. Press-fit systems require specialized press-fit tools and careful installation to avoid damage or misalignment. Both types need periodic inspection and bearing replacement for smooth performance. Proper maintenance improves longevity, but each demands different techniques—stay tuned to learn more about keeping your bottom bracket in top shape.
Key Takeaways
- Regularly inspect and clean threads or press-fit cups to prevent dirt buildup and corrosion.
- Use appropriate tools—wrench for threaded, press-fit tool for press-fit—for proper installation and removal.
- Periodically re-grease threaded bottom brackets; press-fit units may require bearing replacement if noisy or loose.
- Ensure correct torque and proper pressing during installation to avoid damage or misalignment.
- Monitor for creaking, play, or noise, and address issues promptly through cleaning, tightening, or bearing servicing.
Choosing the right bottom bracket for your bike isn’t just about compatibility; it also involves understanding the differences between threaded and press-fit designs. These differences influence how you’ll install, maintain, and service your bike over time. When you’re deciding between the two, it’s essential to grasp how installation varies and what maintenance each type demands.
With threaded bottom brackets, installation tends to be straightforward if you’re familiar with basic bike maintenance. You screw the bottom bracket cups directly into the shell of your frame using a wrench, ensuring they are tightly secured. Because of their threaded nature, you can often install or replace these bottom brackets without special tools beyond a bottom bracket wrench and possibly a crank puller. This simplicity makes them popular among DIY enthusiasts. Maintenance requirements for threaded models are generally minimal; periodic cleaning and re-greasing of the threads help prevent corrosion and ensure smooth operation. If you notice creaking or play, tightening the cups or replacing worn bearings usually resolves the issue.
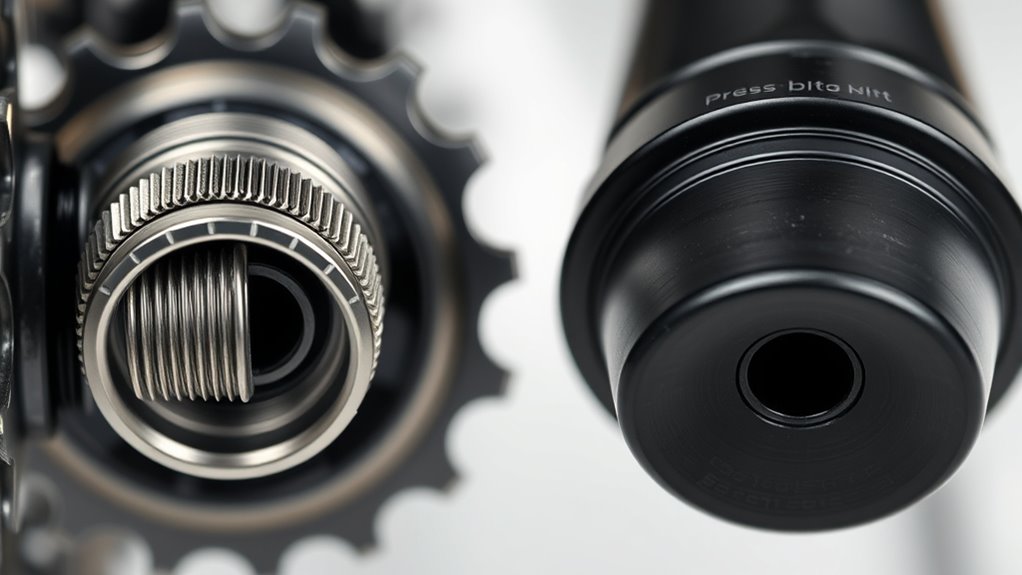
Press-fit bottom brackets, on the other hand, require a different approach during installation. These are pressed directly into the frame’s shell using a special press-fit tool, which applies even pressure to seat the bearing cups securely. Proper installation is critical because improper pressing can cause damage or misalignment, leading to creaking or poor performance. Unlike threaded versions, press-fit bottom brackets don’t have external threads, so they rely on a tight fit within the frame. Maintenance for press-fit types can be more involved. They often require removing the entire bearing assembly if there’s noise, dirt, or play. Since they are pressed into the frame, cleaning and inspecting the bearing surfaces and replacing the bearings as needed become essential tasks. Over time, contaminants can seep in, and the bearings may need replacing, which can be more complex compared to threaded models.
Frequently Asked Questions
How Do I Identify My Bike’s Bottom Bracket Type?
To identify your bike’s bottom bracket type, first check for visible signs: threaded bottom brackets usually have external threads on the shell, while press-fit types are smooth with no threads. Remove the cranks to inspect the interface. For compatibility and installation tips, measure the shell width and diameter. If unsure, consult your bike’s manual or take it to a bike shop for precise identification.
Can I Upgrade From a Threaded to a Press-Fit Bottom Bracket?
Like swapping a cassette on your vintage bike, upgrading from a threaded to a press-fit bottom bracket is possible, but it’s a true conversion. You’ll face installation challenges, as press-fit options often require precise fitting and sometimes reaming or facing. It’s recommended to consult a professional for proper bottom bracket conversion to guarantee your bike remains safe, efficient, and enjoyable to ride.
What Tools Are Needed for Bottom Bracket Installation?
For the installation process, you’ll need specific tools like a bottom bracket wrench or socket, a crank puller, and possibly a rubber mallet. Make certain you have the correct tools for your bottom bracket type, whether threaded or press-fit. You might also need grease and a clean rag. These tools help guarantee a smooth installation, preventing damage and making the process quicker and easier.
How Often Should I Service or Replace My Bottom Bracket?
You should service your bottom bracket every 1,000 to 3,000 miles or as part of your regular maintenance schedule. Keep an eye out for common signs like creaking noises, rough pedaling, or play in the crank. When these issues appear, it’s time to clean, lubricate, or replace the bottom bracket. Regular checks help guarantee smooth performance and extend its lifespan, keeping your ride quiet and efficient.
Are There Compatibility Issues Between Different Bottom Bracket Standards?
Yes, there can be compatibility issues between different bottom bracket standards due to manufacturer differences and standard compatibility. You need to check your bike’s frame specifications and guarantee the bottom bracket matches the shell width, diameter, and threading or press-fit dimensions. Mixing standards might require adapters or special tools, so always verify compatibility before purchasing or installing a new bottom bracket to avoid fitment problems.
Conclusion
Choosing between threaded and press-fit bottom brackets depends on your riding style and maintenance preferences. Did you know that about 60% of cyclists report fewer creaking issues with threaded options? If you want easier installation and reliable long-term performance, threaded might be your best bet. But if you prefer a lighter, modern setup, press-fit could suit you better. Ultimately, understanding these differences helps you make an informed decision to keep your ride smooth and efficient.