
To wrap handlebar tape like a pro, start by cleaning your handlebars thoroughly. Begin near the stem with slight overlap, keeping tension consistent as you wrap outward, following the handlebar’s contours. Cover bar ends securely with tape or finishing strips, and use finishing tape to secure the wrap. Focus on high-contact areas like brake hoods, ensuring tight, smooth wrapping for comfort and durability. Mastering these steps will elevate your technique—keep going to learn all the tips for a professional finish.
Key Takeaways
- Clean handlebars thoroughly to remove grease and residue before wrapping.
- Start wrapping from the bottom near the stem, maintaining consistent tension throughout.
- Overlap each wrap by about half the tape’s width to ensure even coverage and secure fit.
- Wrap tightly around curves and high-contact areas for a smooth, secure finish.
- Secure the ends with finishing strips or electrical tape, and trim excess tape for a clean look.

Wrapping handlebar tape might seem tricky at first, but with the right technique, you can achieve a professional finish every time. The way you wrap your handlebars not only impacts your bike’s appearance but also substantially affects your riding comfort. Properly wrapped tape provides grip enhancement, ensuring your hands stay secure, especially on long rides or in wet conditions. Plus, it offers a chance for aesthetic customization, letting you express your style and match your bike’s color scheme.
Wrapping handlebar tape enhances both bike appearance and riding comfort.
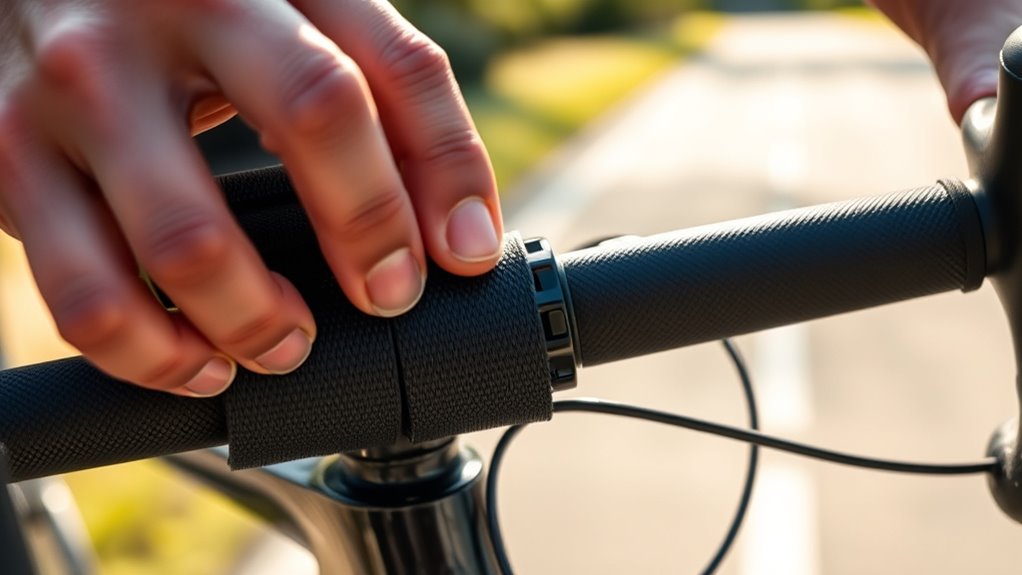
Start by preparing your handlebars. Remove any old tape and clean the surface thoroughly. If needed, apply a light layer of alcohol or cleaner to remove grease or residue. Once dry, position your new tape near the stem, leaving a slight overlap so you can tuck in the ends neatly. When wrapping, keep tension consistent—too loose and the tape will shift; too tight and it could cause discomfort or deform the tape. Use your fingers or a small tool to smooth out wrinkles as you go along.
Begin wrapping from the bottom of the handlebar, closest to the stem, working your way outward. Overlap each wrap by about half the width of the tape. This overlapping not only elevates grip enhancement but also creates a sleek, uniform look. When you reach the curve of the handlebar, make sure to wrap tightly and follow the contour, ensuring a smooth transition. For added stability, cover the bar ends with tape or finish strips, then secure everything with finishing tape or electrical tape. This prevents unraveling and gives a clean, polished appearance.
Pay special attention when wrapping the hoods and brake levers. These areas experience the most contact and require secure wrapping to prevent slipping. For aesthetic customization, consider using different colored tapes or adding decorative patterns. Some riders prefer a single color for a minimalist look or contrasting colors for a striking visual effect. You can also incorporate textured tapes for better grip enhancement or select cushioned options for comfort.
Once you finish wrapping, double-check the tension and alignment. Make sure the tape isn’t too tight or loose, and that the pattern looks even along the entire handlebar. The final step is trimming excess tape and pressing down the finishing strips securely. Your handlebar will look sharp, and you’ll enjoy improved grip and personalized style. With practice, wrapping handlebar tape becomes quick and effortless, transforming your bike’s appearance and ride quality in just a few simple steps. Additionally, understanding the importance of consistent tension can help ensure a professional and durable finish.
Frequently Asked Questions
What Tools Are Needed to Wrap Handlebar Tape Properly?
To wrap handlebar tape properly, you need a few tools: scissors to trim the tape, electrical tape or finishing strips to secure the ends, and possibly a sharp knife for precise cuts. Choose the right tape selection for comfort and grip. Having these tools on hand makes it easier to achieve a professional look, ensuring your handlebar wrap is tight, smooth, and secure for a comfortable ride.
How Do I Choose the Right Handlebar Tape for My Bike?
Did you know that choosing the right handlebar tape can improve your cycling comfort by 30%? To pick the best, consider an ergonomic grip that fits your hand shape for better control, especially on long rides. Also, focus on material durability—some tapes withstand weather and sweat better, ensuring longevity. Select a tape that balances comfort, grip, and durability to enhance your riding experience and keep you confident on every journey.
How Often Should I Replace My Handlebar Tape?
You should replace your handlebar tape every 6 to 12 months, depending on handlebar maintenance and tape longevity. Regularly check for signs of wear, such as fraying, peeling, or loss of grip. If the tape feels less cushioned or starts to look worn, it’s time for a replacement. Keeping your handlebar tape fresh not only improves comfort but also ensures better grip and safety during rides.
Can I Wrap Handlebar Tape on Aerodynamic Handlebars?
Think of wrapping handlebar tape on aerodynamic handlebars like tuning a vintage radio—tricky but doable. You can definitely do it, but focus on tape adhesion and guarantee the tape contours smoothly to the aerodynamic design. Use extra care around curves, and consider thinner or specialized tape for better grip. With patience, you’ll achieve a sleek, comfortable wrap that complements your bike’s aerodynamics and your riding style.
What Is the Best Method to Secure the Tape at the Ends?
To secure the tape at the ends, start with proper end cap installation to keep everything in place. Use tape tensioning techniques, like pulling firmly but evenly as you wrap, to prevent slack. When you reach the end, tuck the tape neatly under itself, then secure it with finishing tape or electrical tape. Finally, install the end caps tightly to finish a professional-looking, secure wrap.
Conclusion
Now that you’ve mastered wrapping handlebar tape like a pro, your bike will look sharp and feel even better to ride. Whether you’re channeling a vintage Tour de France rider or just upgrading your setup, this skill boosts both style and comfort. So, grab your tape, channel your inner artisan, and don’t forget—every great cyclist started with a simple wrap. Before you know it, you’ll be conquering the roads like a true cycling legend from the days of the penny-farthing!