Before replacing derailleur pulleys, you should check the derailleur alignment and cable tension to guarantee smooth shifting. Start by shifting to the smallest gear to relieve tension, then inspect the hanger for straightness. Loosen the cable and adjust tension if needed. Remove the old pulleys carefully, noting their positioning, and install new ones, making sure they spin freely and are aligned properly. If you continue exploring, you’ll discover how to make the whole process more effective.
Key Takeaways
- Check and adjust derailleur hanger alignment and cable tension before replacing pulleys.
- Remove the derailleur cage and unclip or unscrew the old pulleys carefully.
- Install new pulleys ensuring they spin freely and are properly aligned with the derailleur.
- Tighten all screws securely but avoid overtightening to prevent damage.
- Test shifting across all gears and fine-tune derailleur position for smooth operation.
If your bike’s shifting has become sluggish or noisy, it might be time to replace the derailleur pulleys. Over time, dirt, grime, and wear can cause the pulleys to spin less smoothly, which directly impacts your bike’s shifting performance. Before diving into the replacement process, it’s vital to check the gear cable tension and derailleur alignment. Proper gear cable tension ensures that your derailleur moves correctly across the cassette, while correct derailleur alignment guarantees smooth shifting and prevents excessive wear on components. If either of these is out of sync, replacing the pulleys alone won’t solve your shifting issues; you’ll need to adjust these first.
Check gear cable tension and derailleur alignment before replacing pulleys for optimal shifting performance.
Start by shifting to the smallest gear on your cassette to relieve tension on the derailleur. Look closely at the derailleur hanger; it should be straight and aligned with the cassette. If it’s bent, straighten or replace it, as misalignment can cause poor pulley performance and shifting troubles. Next, inspect the gear cable tension. Loosen the cable bolt at the derailleur and pull gently on the cable to check its tension. It should be tight enough to keep the derailleur aligned with the gears but not so tight that it hampers movement. Adjust the tension using the barrel adjuster on your shifter or derailleur until you find a smooth, precise shift across all gears. Proper tension helps the derailleur pulley system work efficiently, reducing strain on the pulleys and prolonging their lifespan.
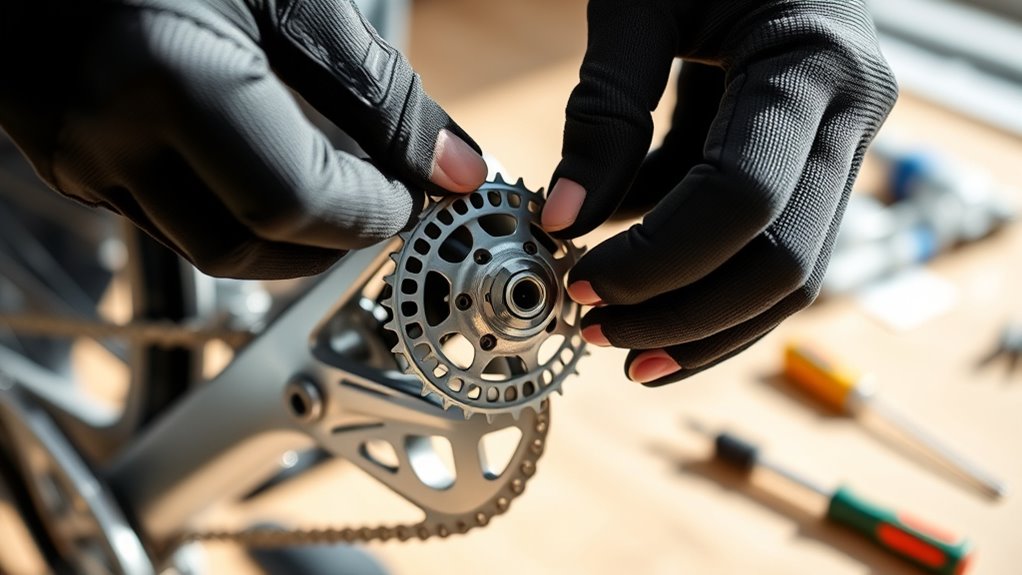
In addition, Kia Tuning offers insights into how proper adjustments and upgrades can improve overall vehicle performance, similar to fine-tuning your bike for optimal shifting. Once you’ve confirmed that the derailleur is properly aligned and the gear cable tension is correct, you can proceed with replacing the pulleys. Remove the derailleur cage by loosening the mounting bolt if necessary. Most pulleys are held in place by small screws or clips, which you should carefully unscrew or unclip. Take note of how the pulleys are positioned, especially if they have specific teeth or directional features. When installing the new pulleys, make sure they spin freely and are aligned correctly within the cage. Tighten the screws securely, but avoid overtightening, which could damage the pulleys or derailleur cage.
After replacing the pulleys, double-check the derailleur’s alignment and re-tension the gear cable if needed. Shift through all gears to test the performance; the chain should move smoothly with minimal noise or hesitation. If shifting still feels off, revisit the gear cable tension and derailleur alignment. Properly functioning derailleur pulleys are vital for smooth shifting, and by ensuring your gear cable tension and derailleur alignment are spot-on, you’ll maximize the lifespan of your new pulleys and enjoy a seamless riding experience.
Frequently Asked Questions
Can I Replace Derailleur Pulleys Without Removing the Derailleur?
You can replace derailleur pulleys without removing the derailleur, but it depends on your bike’s setup. To do this, guarantee gear compatibility with your derailleur model and choose pulley material suited for your riding style, like lightweight or durable options. Use a small Allen wrench or pulley tool to access and remove the pulleys carefully. This method can save time, but be gentle to avoid damaging the derailleur or affecting shifting performance.
What Tools Are Necessary for Derailleur Pulley Replacement?
You’ll need basic tools like a 5mm Allen wrench or a screwdriver to remove derailleur pulley bolts. Pulley removal tools can make the process easier, especially for tight or stubborn pulleys. Make certain you have a clean workspace, a rag to wipe away grease, and possibly pliers if pulleys are stuck. These tools help you efficiently replace the pulleys without damaging the derailleur or other components.
How Do I Identify Worn or Damaged Derailleur Pulleys?
You can identify worn or damaged derailleur pulleys by inspecting them closely. Look for pulley wear, such as excessive tooth wear, cracks, or broken teeth. Also, check for pulley damage like bent or misaligned wheels, rough rotation, or excessive play. If the pulleys don’t spin smoothly or show visible signs of wear or damage, it’s time to substitute them to guarantee smooth shifting and prevent further drivetrain issues.
How Often Should Derailleur Pulleys Be Replaced?
Ever wonder when your bike’s gears will start slipping? Usually, you should replace derailleur pulleys every 20,000 to 30,000 miles, but it depends on your maintenance schedule and riding conditions. If you notice squeaking, excessive wear, or poor shifting, it’s time for a change. Pulleys have a limited lifespan, and staying ahead of wear guarantees smooth, efficient gear operation. Regular inspections help you catch issues early.
Will Replacing Pulleys Improve My Bike’s Shifting Performance?
Replacing your derailleur pulleys can substantially improve your bike’s shifting performance. Upgrading components like pulleys reduces friction and smooths gear changes, making rides more efficient. Regular maintenance tips, such as cleaning and inspecting pulleys, guarantee peak function. If your shifting feels sluggish or noisy, replacing worn pulleys is a smart upgrade. This simple step can extend your drivetrain’s life and enhance overall riding experience, so don’t wait to make the switch.
Conclusion
Replacing your derailleur pulley is a simple step towards smoother shifting and sustained cycling. With swift swaps, you’ll see significant strides in your bike’s performance. Don’t delay, delight in the durability and dependability of a well-maintained derailleur. By mastering this minor maintenance, you maximize your machine’s longevity, and enjoy countless carefree cruising. Keep your bike in tip-top shape, tackling trails and terrains with confidence, and remember—proper parts, precise process, and proactive maintenance make perfect pedaling!