This guide helps beginner mountain bikers choose a hydration pack, adjust it securely, and prepare its reservoir and hose before riding. You will finish with a pack that carries the water and essentials you need without shifting, rubbing, or interfering with your helmet or protective gear. Allow 30-45 minutes for selection and setup; allow extra time if you need to clean a new reservoir or test the fit with riding clothes.

Get sports gear delivered free — and shop member deals
- Fast, free delivery on millions of items
- Access to Prime Big Deal Days deals on October 6–7
- Prime Video, Amazon Music and more included
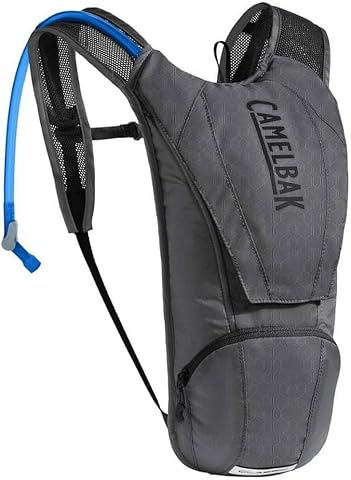
CamelBak Classic Bike Hydration Pack
- ✔ Reservoir capacity: 85 oz
- ✔ Back panel: Breathable air mesh
- ✔ Harness: Ventilated mesh

NEVO RHINO 12L Hydration Backpack with 2L Water Bladder
- ✔ Pack capacity: 12 L
- ✔ Weight: 8.5 oz
- ✔ Bladder capacity: 2 L
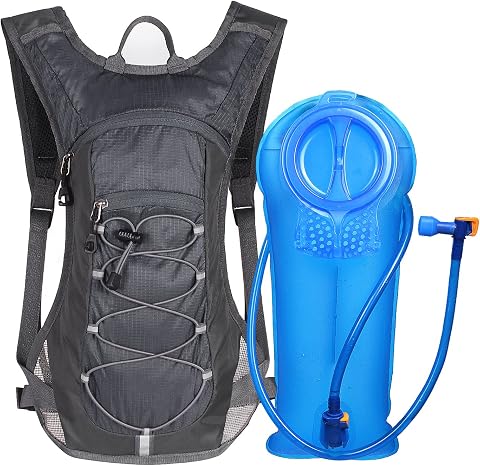
Unigear Hydration Pack Backpack with 2L Water Bladder
- ✔ Pack dimensions: 16.5 x 8 x 6 in
- ✔ Weight with bladder: 1.1 lb
- ✔ Bladder capacity: 2 L (70 oz)
Difficulty: Beginner | Time: 30-45 minutes for selection, fitting, and setup
What You’ll Need
Tools & Materials:
- Mountain bike hydration pack with a reservoir and drinking hose
- Water for filling and leak testing
- The clothing, helmet, and protective gear you plan to ride in
- A clean towel or sink for filling and checking the reservoir
Knowledge:
- Basic understanding of ride length and access to water on your usual trails
- Ability to adjust backpack straps and follow the reservoir maker’s care instructions
Choose a pack based on the water and gear you actually need to carry. Reservoir capacities and pack volumes vary; check the product specifications rather than assuming every pack holds the same amount. A pack is not a replacement for carrying enough water for your route, weather, pace, and available refill points.
CamelBak Classic Bike Hydration Pack
The CamelBak Classic earns our top spot for riders who would rather prioritize water than pack a change of layers or substantial gear. Its 85-ounce Crux reservoir has more stated capacity than the 2-liter bladders included with both NEVO RHINO and Unigear. That difference makes CamelBak the clearest choice here for rides where drinking capacity is the main concern, although reservoir volume alone does not determine how much water every rider needs.Its bike-specific details also help it edge ahead: a ventilated mesh harness and breathable air-mesh back panel suit active riding, and reflective accents can improve visibility when light is fading. The ergonomic reservoir handle and on/off lever are practical details for filling and controlling the bladder. In contrast, NEVO RHINO is the more cargo-oriented pick, with a stated 12-liter capacity, while Unigear supplies more explicit fit-range information.The central compromise is storage. CamelBak’s small zippered pocket is for essentials, not a full ride kit, and the provided description does not state the pack’s total cargo capacity. Choose it when the larger reservoir and cycling-focused design outweigh extra carrying room. If you need space for more than small items, NEVO RHINO is the more convincing alternative; if you want clearly documented strap coverage, Unigear gives us more fit detail.
Pros:
- Includes an 85-ounce Crux reservoir, the largest stated capacity in this lineup.
- Breathable air-mesh back panel and ventilated mesh harness support airflow.
- Reflective accents add a visibility detail not listed for the other two packs.
- Reservoir has an ergonomic handle and on/off lever.
Cons:
- Storage is limited to a small zippered pocket.
- The supplied details do not specify total pack capacity or adjustment ranges.
Best for: Mountain bikers who want the largest stated reservoir in this comparison, breathable contact points, and reflective details for lower-light rides.
Not ideal for: Riders who need room for tools, food, extra clothing, or other substantial cargo; the listed storage is limited to a small zippered pocket.
Bottom line: We’d choose the CamelBak Classic when greater stated water capacity and bike-focused details matter more than carrying space.
“We’d choose the CamelBak Classic when greater stated water capacity and bike-focused details matter more than carrying space.”
NEVO RHINO 12L Hydration Backpack with 2L Water Bladder
For mountain bikers who need to carry more than water and a phone, the NEVO RHINO 12L is the most cargo-forward option in this group. Its stated 12-liter capacity gives it a clearer role for snacks, tools, and other small ride supplies than the CamelBak Classic, whose listed storage is just a small pocket. It includes a 2-liter BPA-free PEVA bladder, so the pack balances useful carrying room with a familiar hydration capacity rather than maximizing reservoir size.The lightweight 8.5-ounce figure, breathable mesh back, and adjustable shoulder and chest straps suggest a simple setup aimed at keeping bulk down. Its water-resistant, tear-resistant nylon adds a useful degree of protection for ordinary trail conditions, but water-resistant is not the same as waterproof. Unigear is also described as splash-resistant, and it offers adjustment at the waist as well; NEVO RHINO instead stands out through its stated cargo capacity and fabric description.There are limits to what we can conclude from the available information. It is designed for several outdoor activities, not specifically described with the bike-focused visibility details of CamelBak, and its 2-liter bladder is smaller than CamelBak’s stated 85-ounce reservoir. Choose NEVO RHINO when cargo flexibility matters more than maximum water volume. Skip it if your ride calls for a larger reservoir or if you need documented waterproof protection.
Pros:
- Stated 12-liter pack capacity offers more cargo flexibility than the other descriptions establish.
- Includes a 2-liter BPA-free, food-grade PEVA bladder with a leak-resistant bite valve.
- Breathable mesh back and adjustable shoulder and chest straps.
- Water-resistant, tear-resistant nylon body.
Cons:
- Its 2-liter bladder has less stated capacity than the CamelBak Classic’s 85-ounce reservoir.
- The description does not list reflective details or a waist strap.
- Water-resistant fabric should not be treated as waterproof protection.
Best for: Riders who want a 2-liter bladder plus more room for ride essentials, and who value a lightweight pack with adjustable shoulder and chest straps.
Not ideal for: Riders seeking the largest reservoir in this comparison, a cycling-specific visibility feature, or confirmed protection in heavy rain.
Bottom line: We’d pick the NEVO RHINO when carrying room and a light included bladder matter more than maximizing water capacity.
“We’d pick the NEVO RHINO when carrying room and a light included bladder matter more than maximizing water capacity.”
Unigear Hydration Pack Backpack with 2L Water Bladder
The Unigear Hydration Pack is the fit-focused, compact alternative for riders who want a simple 2-liter setup rather than the larger water supply of CamelBak or the stated cargo capacity of NEVO RHINO. Its strongest distinction is the clearest adjustment information in this lineup: shoulder, chest, and waist straps, with a listed fit for chest sizes from 27 to 50 inches. That specificity helps buyers assess fit before choosing, though it does not guarantee that the pack will suit every body or riding position.At 1.1 pounds with the bladder, it is not the lightest stated option—that distinction goes to NEVO RHINO’s listed 8.5-ounce weight, though the descriptions may not measure weight on the same basis. Unigear’s 2-liter BPA-free bladder is replaceable, which gives us a practical maintenance option. Its splash-resistant nylon is intended for light exposure, but, like NEVO RHINO’s water-resistant construction, it should not be mistaken for a rainproof shell.Where Unigear gives up ground is storage. The small front pocket is useful for a few essentials but not a substitute for the NEVO RHINO’s stated 12-liter capacity. And it cannot match CamelBak’s larger stated reservoir. This pack makes the most sense when adjustable stabilization and a compact profile are priorities; choose one of the others if you need more cargo space or water for a longer outing.
Pros:
- Adjustable shoulder, chest, and waist straps help tailor the fit for movement.
- Listed to fit chest sizes from 27 to 50 inches.
- Includes a replaceable 2-liter BPA-free bladder.
- Compact nylon pack is splash-resistant for light exposure.
Cons:
- Small front pocket limits storage for tools, clothing, and other ride gear.
- Its 2-liter bladder is smaller than the CamelBak Classic’s stated reservoir.
- Splash resistance may not protect belongings in heavy rain.
Best for: Riders who want a compact pack with a replaceable 2-liter bladder and clearly stated shoulder, chest, and waist adjustment.
Not ideal for: Riders who need substantial cargo storage, a reservoir larger than 2 liters, or protection for belongings in heavy rain.
Bottom line: We’d choose Unigear for its adjustable fit and replaceable bladder, provided compact storage is enough for the ride.
“We’d choose Unigear for its adjustable fit and replaceable bladder, provided compact storage is enough for the ride.”
As an Amazon Associate we earn from qualifying purchases.
Before You Start
Put on your usual riding layers, helmet, and body armor before fitting a pack. Check the pack and reservoir for damage, and read the maker’s instructions for cleaning, filling, and valve use. If the reservoir is new or has been stored for a long time, clean it as directed before drinking from it. Do not use a pack with a cracked reservoir, damaged hose connection, or buckle that will not stay closed.
Plan a short test ride before relying on a newly fitted pack for a long or remote route. Carry only items that the pack is designed to hold, and keep sharp tools or pointed objects secured so they cannot puncture the reservoir or injure you in a fall.
Step-by-Step Instructions
Step 1: Choose a pack for your ride
Estimate the water and equipment you will need for your typical ride. Compare each pack’s reservoir capacity, storage volume, fit range, hose routing, and compatibility with your helmet and protective gear. Choose one with enough space for essentials such as a phone, keys, repair kit, and a light layer without forcing it to bulge. If you ride in hot conditions or far from refill points, plan for a larger water supply or a refill option instead of relying on a small reservoir.
Try the pack on if possible. Check that the back panel sits comfortably, the shoulder straps adjust to your body, and the hip or sternum straps will not press on your gear. Choose a pack that fits your body shape and riding kit.
Tip: A full reservoir adds noticeable weight. Consider how the pack feels loaded, not only how it feels empty.
Check: You have a pack with enough capacity for your usual route, and its straps and shape can sit comfortably over your riding kit.
Step 2: Inspect and clean the reservoir
Remove the reservoir from the pack and examine its body, closure, hose connection, bite valve, and any shutoff valve. Look for cracks, worn seals, dirt, or loose connections. Clean the reservoir and hose according to the manufacturer’s instructions, especially before first use. Let the parts dry as directed if you will not use the reservoir right away.
Tip: Do not use hot water, cleaning products, or tools unless the reservoir maker says they are suitable. Some materials can be damaged by unsuitable cleaners or heat.
Check: The reservoir and hose are clean, undamaged, and assembled according to their instructions.
Step 3: Fill and check the reservoir
Fill the reservoir with an amount of water appropriate for your ride, staying within its marked capacity. Close the opening fully and connect the hose and valve securely. Hold the reservoir over a sink or towel, turn it in different directions, and gently squeeze it to check for leaks. Open the bite valve as instructed to confirm water flows, then close any shutoff valve before packing the reservoir.
Tip: Do not overfill. Leave any expansion space the maker specifies, and confirm the closure is fully sealed before placing the reservoir in the pack.
Check: The reservoir stays dry around its seams and connection points, and water flows from the valve when opened.
Step 4: Load and secure the reservoir
Slide the filled reservoir into its designated sleeve, keeping the hose routed through the intended exit. Attach any reservoir clip or hanger inside the sleeve. Arrange the hose so it is not twisted, kinked, trapped under the reservoir, or pressed against sharp tools. Put repair items and other gear into their intended compartments, and keep heavy objects close to your back when the pack design allows.
Tip: Close the reservoir sleeve carefully. A pinched hose or fabric caught in the reservoir opening can obstruct water flow or contribute to a leak.
Check: The reservoir sits flat in its sleeve, the hose has a clear path, and the pack closes without forcing the contents.
Step 5: Put on the pack and adjust the straps
Put on the loaded pack over your normal riding layers. Tighten the shoulder straps until the pack rests against your back without pulling your shoulders down. Fasten and adjust the sternum strap, if provided, so it keeps the shoulder straps in place without restricting breathing. Fasten the hip belt if the pack has one, positioning it as intended by the maker. Move your arms, lean into a riding position, and turn your head to check that the pack does not lift, swing, or press uncomfortably.
Tip: Adjust the pack while wearing your helmet and armor. A strap that seems clear in casual clothing may rub or interfere with riding gear.
Check: The pack stays close to your back through normal riding movements, and you can breathe, turn your head, and reach the handlebars comfortably.
Step 6: Route and position the drinking hose
Route the hose through its intended shoulder strap or guide, if the pack has one. Position the bite valve where you can reach it without releasing your grip on the handlebars for long. Secure any magnetic clip or valve holder so the hose will not flap into the wheel, snag on branches, or catch on your helmet. Check that the valve is open when you want to drink and that a shutoff valve is closed when the pack is being carried or stored.
Tip: Keep the hose away from moving parts and avoid routing it where a fall could trap it or pull sharply on the reservoir connection.
Check: The hose remains in place when you move, and you can reach the valve without stretching or twisting awkwardly.
Step 7: Test the loaded pack before a long ride
Walk, bend, and gently jog in the loaded pack, then take it on a short ride near home or a refill point. Drink through the valve and check that the water flows freely. Stop and inspect the reservoir sleeve, hose connection, straps, and clothing-contact areas. Adjust strap tension or hose placement if the pack bounces, rubs, leaks, or makes drinking difficult.
Tip: Do not wait until a remote ride to find out that the hose is kinked or the pack rubs under your riding posture.
Check: The pack remains stable, no water leaks, the hose delivers water, and there are no new pressure points or rubbing spots after the test.
Common Mistakes to Avoid
- Choosing a pack that is too small for the water or gear needed on the route. — Estimate water needs and list essential carry items before comparing packs. Check both reservoir capacity and storage volume, and account for refill access and conditions.
- Overfilling the reservoir or failing to close it completely. — Follow the fill limit and closure instructions, then test for leaks over a sink before loading the reservoir into the pack.
- Tightening straps too much or fitting the pack without riding gear. — Adjust the loaded pack while wearing your usual clothes, helmet, and armor. Keep the pack stable without restricting breathing or movement.
- Leaving the hose loose, kinked, or routed near moving parts. — Use the pack’s hose guides and valve holder, check the full hose path, and test water flow before riding.
Troubleshooting
Problem: The reservoir or pack is wet after filling.
Solution: Remove the reservoir and locate the leak over a sink or towel. Reseat and close the opening, reconnect the hose, and check seals and the reservoir body. Replace damaged parts; do not ride with a leaking reservoir.
Problem: Water does not flow through the hose.
Solution: Check that the shutoff valve is open, the bite valve is unlocked, and the hose is not kinked or pinched. Disconnect and reconnect the hose as directed by the maker, then test flow before riding.
Problem: The pack bounces or shifts when riding.
Solution: Reposition the reservoir and heavy items, then adjust the shoulder, sternum, or hip straps in small increments. If it still moves or feels unstable, the pack may not fit your body or load.
Problem: The pack rubs your neck, shoulders, or armor.
Solution: Check strap placement and hose routing while wearing your complete riding kit. Loosen or reposition straps as needed. If contact persists, try a different pack shape or fit rather than riding through painful rubbing.
What Success Looks Like
Your pack sits close to your back and stays stable through riding movements. The reservoir is intact, sealed, and free of leaks; water flows through an unkinked hose; and the valve is reachable without interfering with your helmet, protective gear, breathing, or control of the bike. After a short test ride, the pack has not shifted, leaked, or caused persistent rubbing.
Next Steps
After the ride, empty and clean the reservoir and hose as directed by the manufacturer. Let the parts dry fully before storing them to reduce odors and buildup. Check the reservoir, valve, hose, straps, and buckles for wear after use, and replace damaged components before the next ride. Recheck pack fit whenever you change clothing layers, protective gear, or carried load. For longer or remote rides, plan water quantity and refill points for the actual route and conditions.
Frequently Asked Questions
How much water should I carry in a mountain bike hydration pack?
Choose an amount based on ride duration, temperature, effort, your personal needs, and access to refills. Follow local guidance for hydration when available, and do not assume a single capacity suits every ride. For remote routes, plan your supply before leaving and carry a refill option if needed.
Should I fill the reservoir all the way?
Fill it only to the limit specified by its maker. Some reservoirs need space beyond the water level for closure or expansion. Seal it fully and check for leaks before placing it in the pack.
How do I stop a hydration hose from swinging while I ride?
Route it through the pack’s guides and secure the bite valve in its holder or magnetic clip, if supplied. Confirm the hose cannot reach the wheels or snag on branches, and check that it does not pull on the reservoir connection as you move.
Can I use a mountain bike hydration pack with body armor?
Many riders wear packs over or with protective gear, but fit depends on the pack and armor. Try the loaded pack with your full riding setup. Check for pressure points, restricted breathing, helmet interference, and strap contact before taking it on a long ride.
How do I prevent the reservoir from developing an odor?
Clean the reservoir and hose according to the manufacturer’s instructions after use, then dry the parts fully before storage. Avoid leaving water sitting in a closed reservoir for long periods, and use only cleaners the maker approves.
Fall Picks
fall essentials
As an affiliate, we earn on qualifying purchases.